Sunday, June 27, 2010

How to Make Aventine Elephants Stick to Bases

Here's the elephant and tower; still need to do up the crew, but that will be another day. Here's what it looks likes with the tower off.
You'll note the little "lift-kits" under the elephant's feet; this is a tip I picked up from Jeff Jonas' excellent site - Ancient Battles. The lifters will assist when flocking the bases, as well as providing a more secure contact with the base. As Jeff recommended, I used fast-setting epoxy for these - as the model is quite heavy and wouldn't want it breaking off the base.

Here's another shot with the tower mounted. He (or she?) will be mounted on a Litko base - leftover from a Chariot Wars army. I'll probably start on the other Aventine elephant (a fully-armored one) next; before completing the crew - want to keep the momentum going.

Saturday, June 26, 2010

Aventine Elie Project +2

Painted the head armor & tusks; as well as the securing ropes for the howdah. Also touched up the elie's hide just a bit. Added some Vallejo Red & White to the Ceramcoat Mudstone and dry brushed the edges of the ears and front of the trunk - as well as small patches around the body. A final very light dry brushing of Ceramcoat Mudstone was applied overall. This should be it for the skin; it is neither too dark nor too light, and a good contrast to the bronze head armor.
The photo below is using mostly sunlight to better show the skin tone and the bronze coloring. It's probably hard to tell in the photo, but the scale armor is painted in alternating bronze and copper.
Next, the blanket will be painted blue with, hopefully, a white spiral wave border. After that the elephant should be done and the tower and crew can be painted.

Aventine Elie Project +1

Experimented with several colors to dry-brush the elephant's skin.  Vallejo Saddle Brown mixed with a little Vallejo German Grey was used as a base coat over the black primer undercoat. The colors were chosen because that's basically the base tone I wanted, and  they were the colors I already have. The photo below shows this base coat.
Although I'm no expert on elephants (amongst a host of other things I'm not), there are enough images available on the internet that make Indian elephants appear less "gray" than their African cousins. In fact, the ones I've seen in the past seem to vary in tone from pinkish-white to a dark brownish-gray. I believe this has a lot to do with the mood they're in too - if you know what I mean. Here are several images of Indian elephants that I found on a quick internet search.

Anyway, the next coat was a mixture of Vallejo German Grey and Ceramcoat Mudstone - again because I hoped this would be the color I wanted and also what I have on-hand.
A "final" coat of all three previously used colors - dunno why, but thought it might blend the colors better. I'll see how it looks after the rest of the model is painted - maybe it'll need highlights or tone downs here and there, if needed.
The technique to paint elephants, basically only dry-brushing, is very simple; However, to get the correct coloring is hard. I'm still not fully-satisfied with the coloring, but as already mentioned, I'll hold off until the rest of the model is painted.

Friday, June 25, 2010

Aventine Elie Project

Thanks to a quick discussion on the NHMGS Yahoo Group this week, the Metro Seattle Gamers offered to host a game next month at their club house. I haven't been there before, and am looking forward to co-hosting a re-match of Adrian's Republican Romans versus the 1-0 Pyrrhic Army. This commitment has caused me to start on one of the Aventine war elephants recently received. It is an Hellenistic elephant with crested head armor. The head armor is probably a little later than Pyrrhus' time, but I like the look, and it can be used in a later-Successor army alongside a fully-armored elephant I also ordered.
Initially, Keith at Aventine forgot to include the two-man fighting tower (likely due to my last minute head swap request and also all the free samples he included), but he quickly sent me out not only the missing one, but also another variant. The crew pictured above are from two different sets - I had ordered two sets, but Keith actually sent me three different sets! Thanks again Keith! The mahout and one of the guys going in the tower are in bronze muscled cuirass and one guy in linothorax. I used some Tamiya Putty to fill some of the gaps between the two halves of the elephant, and also the trunk piece.
To align the head better, some of the inside area on the body was carved away. Drilled the head and body to accept a round toothpick; not sure if this really is helpful or not, but it only took another minute or so to do
Test-fitting with tower and mahout. The tusks are the reinforced optional type (a plain type is also provided). Next, black primer will used as the undercoat.

Sunday, June 20, 2010

Victrix Highlanders - Completed

Well, almost - still need to paint up the musicians, standard bearers and the mounted officers - and probably the sapper too. However, the main body of the regiment is ready for the gaming table.
They're individually mounted on 3/4" (approx. 20mm) metal fender washers. The next photos show them on magnetic bases, four per; grenadiers, lights, and center companies.

I know the center company sergeants should be carrying spontoons, but the Flank Companies set didn't include them. The sergeants for the light companies would have carried muskets, but the grenadiers sergeants should have spontoons. Either way, they fill the ranks up so there are four stands of center, and two stands each of flank.

Friday, June 18, 2010

Victrix Highlanders - WIP + 7

Knocked out a few more steps today: 1) Finished all the white belts and lacing. 2) Applied Vallejo Cadmium Red as a base coat for the jackets. 3) painted the bonnet plumes - red for the center companies, red over white for the grenadiers, and red over green for the lights. The plume coloring is a bit unique to the 42nd; most other center companies were white over red, and grenadiers and lights were solid red and green, respectively. I didn't go through the effort to make the lacing end in "bastion" shape, nor left the center of the lacing open.
These are the flank companies - grenadiers in the two first rows, and lights in the last two. Cockades will be red for grenadiers and green-edged red for lights (I might just leave them red). As I mentioned before, the box I got from Maelstrom Games was flawed in that many of the right arms were for center companies - having only the tuft and not the birdcage wings. Steve at Victrix is sending me a replacement box, but since I  had already started on these, I just painted the tufts to look like wings.
Next, the jackets will be highlighted with red, and maybe red & yellow (or white). Silver buttons and blue facings will follow. After these, the muskets, haversacks, greatcoat rolls and canteens should pretty much finish the paint work. So far, I really like this painting technique - using the black undercoat as much as possible for black lining. It works well for the multitude of belts and lacing on Napoleonics. It is also convenient that British backpacks are black.

Monday, June 14, 2010

Aventine Elephants

I received my order of Aventine elephants today. I ordered one unarmored one and one fully-armored one. The unarmored one is intended to supplement the Magister Militum one I already have, for my Pyrrhic army. I actually ordered a head with an armor plate for this one too - thinking I could also use it in a later-Successor army. The fully armored one is for a yet-to-be-built Seleucid army.

Here are the parts for the two elephants; unfortunately, the two-man tower is missing, but I already sent Keith at Aventine an email - I'm sure he'll send it out soon.
As you can see, there are a lot a optional parts - two types of tusks, and the trunk with the Roman (which was a surprise freebie - thank you, Keith!). My wife suggested I devise a way to swap out the trunks and the two heads for the unarmored elie. I think with rods or dowels, this may be do-able.

Here are the finely-sculpted crews - I ordered two sets, but Keith added another set in, again free of charge. I might be off on which figures are in which sets - but, one set was a three-man (two-man tower) crew, and the other two are four-man crews (three-man tower).
Here are the Romans sent as free samples - they are very, very nice!
This next picture shows the great size disparity between the Aventine elephant and my first elephant from Magister Militum. I knew the MM one was small after seeing it next to my buddy's Crusader Carthaginian elies awhile back. That's fine though - the MM elie has faithfully served my Pyrrhic army several times in the past.
And finally, a Foundry figure next to some of the Aventine guys - they're pretty compatible, although the Roman Centurion is rather large; Good for a command figure.

Sunday, June 13, 2010

Victrix Highlanders - WIP + 6

Taking a painting tip from local veteran painter and gamer, Doug Hamm, I tried a new (for me) style of painting. Things that I'd normally paint last were painted first. For instance the lacing and straps have been painted on these Highlanders before painting the jacket.
Doug and I were discussing painting at Enfilade! a few weeks ago. He told me he sometimes painted laces and buttons first, then the surrounding clothing. This way, he said, you already have the area around it "black lined." At first, I thought this would be harder than my normal way of painting. Basically, painting from the inside out; Flesh, underclothes, outer clothing, then stuff like lace, buttons, and straps. I must admit my normal method is fairly sloppy when the paint is initially applied, then cleaned up with black lining. This "new" method does mean I have to be a lot more careful applying the paint up front, but it should speed up the time in the long run. If I'm careful adding the red to the jacket, the black lining is already done.

Fender Washer Bases on Magnetic Stands

Originally, the Victrix Highlanders were going to be based four to a stand of either 40mm X 40mm or 45mm X 45mm. After thinking it over, I decided to base them individually on metal washers like the rest of the Victrix and Perrys I already have. There are only 36 of them and I still had over 100 fender washers, so it was no big deal. The washers themselves are 3/4" in diameter - which is approximately 20mm.

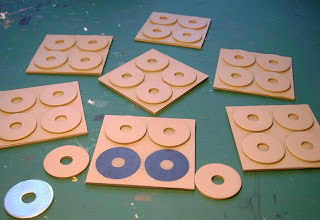
Here are the basic components for the basing - metal washers, plasticard cut square to fit four washers, and magnetic sheeting on top of it:
The washers are from Fastenal, a vendor that sells bags with 100 washers for about $6.00 a bag. The plasticard was from my local hobby shop, and the magnetic sheets from JoAnns. The figures would have normally been based on the washers first, prior to priming and painting; but since I thought they'd go on multi-figure stands after painting they went on popsicle sticks for painting first. This actually may have been a good thing, as the washers masked the area they go on the bases when sprayed the base coat of tan.
Should be more magnetic attraction than if it the magnetic sheet was painted over - as the earlier ones were - see the photo below with the figure removed from the base:
Next, the stands will get some static grass to the areas around the washers. The washers will be flocked after the painted figures are attached to them.

Saturday, June 12, 2010

Shieldwall WAB 2nd Ed. Playtest

Played a small Shieldwall game using the new WAB 2nd Edition rules today at the Edgewood Bunker with Adrian. We scaled back our Norman armies to 1,000 points each, more or less. Probably had too much of a percentage of mercenaries, but we went with what we had. Adrian used an all cavalry army consisting of a unit each of Norman Milites, Devroet with throwing spear and javelins, and a Pueri light cav unit. His Milites and Devroet are both 16 figure units - all on warhorses to boot! He made these unit extra-large to counter a Welsh army that Dan P. has - so Dan's unit wouldn't outnumber his two-to-one in combat for the FBIGO option. It was one of their early WAB armies, and I think Adrian is going to reconfigure his. My army was a Milite cav unit of 12 figures with lances, a 10 figure Pueri unit and three mercenary Dogs of War units. The mercs consisting of one unit each of bowmen, crossbowmen, and footmen with double-handed axes. I'd rather have had javelinmen and spearmen instead of the crossbowmen and axemen, but didn't have any at the moment.

This is a shot of my forces after the opening moves:
The shot below is after the charge of Devroet being declared on the crossbowmen who chose to flee - they were too close to fire and flee. The Devroet ended up charging into the merc axemen. The resulting combat was a tie, with a musician roll off. The Serjeants' musician won the momentum point, and they also redressed their ranks. Sadly, they lost the next round, quite badly, and was reduced to less than five figures - actually only one, who fled off the table.
Things were a lot better on the other side of the battle. My Pueri and merc bowmen did well enough to scare off Adrians Pueri. He later attempted to charge my Pueri with his Milites, but they wisely fled out of range of the charge. However, his Milites ended up within reach of my Milites who charged them. They counter charged, but eventually lost the round of combat. They chose to flee, but I overran them. His Comes was in the unit and that ended the game in the middle of Turn 5. We had decided to end at this turn at the beginning of the game anyway.
All in all it was a relaxed game, looking up some of the new changes to the rules and discussing them - like the musician roll off to decide momentum, but not actually winning the combat. Hopefully, we can play a game a month until we're comfortable with the new rules - although Adrian has a busy schedule. We also talked about what we could host at next year's Enfilade! - the local biggie historical convention here in the Pacific Northwest. We might even do a "Last Samurai" with modified Sharp Practice rules. I have to find that Dixon Samurai I have and lop off his head then attach a Victrix head onto it for Tom Cruise.

Friday, June 11, 2010

How to Stripe Kilts with a Micron Pen

I decided to go with the 42nd "Black Watch" Highland Regiment. The reason for this is the multiple colored stripes of the 79th's tartan pattern - which would not only be really difficult to execute, but also make the kilt look too "busy" IMO. Switching to the 42nd didn't pose any historical problems either - the two regiments, along with the 92nd, all have outstanding service records. They also all served in the Peninsula and Waterloo, as well as the Egyptian Campaign - in the same battles most of the time too. I do have to print out the 42nd's colours - but even that was obtained off the internet from Warflag.com.

Thanks to this tartan painting tutorial, I learned of the use of Micron Pens for the thin black stripes. When I did a search on TMP about it, I found one thread, but all the comments were positive for its use. After having lunch with my wife today, we stopped in a Michael's and found a 005 Micron Pen. It took less than 10 minutes to do all the black stripes on the 30-odd tartans. A couple of them need a little touch up - where my pen stroke was a bit flaky. Otherwise, this is an indispensable tool for any tartan painting arsenal. I highly recommend it.
I may add red stripes to a few of them to represent grenadiers. Apparently their kilts had red stripes - at least up until 1812.

The piper is painted in the Royal Stewart pattern below:
His tartan actually looked better before the white lines were added; now it looks too much of a "good" thing. I should've stopped after the yellow lines were added between the blue ones - oh well, I'm not redoing it.
The stockings were pretty easy - the sculptor, bless his heart, only has the top of them exposed above the garter - which the gaiters come up to. The top of the stockings were painted white and pink was dabbed evenly around it to represent the cross-hatching. The gaiters were dry-brushed a light gray. I'll probably give the gaiters a black wash too. This completes the Highlander-specific painting. The rest of the painting will be like regular British infantry.

Thursday, June 10, 2010

Wargames Illustrated #272

Thanks to one of the local gaming stores, The Panzer Depot, which sends out newsletter emails - I picked up a copy of Wargames Illustrated #272. This issue includes the Osprey MAA Napoleon's Guard Infantry (1). That alone is worth twice the cost of the magazine. I actually picked the mag up at another closer (to me) gaming store, The Game Matrix.

Here's the info on the newsletter from The Panzer Depot:
Just Arrived!

Wargames Illustrated


WI-272   June 2010 Issue    $8.00

WI-272


FIGHTING FOR KING AND COUNTRY
We introduce you to the topsy-turvy world of Napoleonic Europe and the thread that runs through all our theme coverage - Wilhelm von Dörnberg.

OLD SOLDIERS NEVER DIE
Barry Hilton casts a light on the action around Lübeck in 1806 and presents a scenario for fighting one of von Dörnberg’s early battles.

CREATING A KINGDOM: WESTPHALIA
Created in 1807, the Kingdom of Westphalia was to be the centerpiece of the Confederation of the Rhine. Sam Mustafa writes about the rise and fall of this kingdom.

THE BATTLE OF LEIPZIG
Over 600,000 men fought for four days in this, the largest of Napoleon’s battles. Paul Olzanski and his friends used around 10,000 models in their re-fight, and here we present a photo-report on how the event panned out.

GRENADIER A PIED DE LA GARDE IMPERIALE
A close look at Napoleon’s elite infantry and the new Victrix plastic box set of the same name.

PROJECT HOUGOUMONT
Here’s how you can get involved with the project to renovate Hougoumont Chateau.


THE DEVELOPMENT OF FOG: RENAISSANCE
After the success of Field of Glory: Ancient and Medieval, author Richard Bodley Scott has penned a follow up - FOG: Renaissance - and he takes us through the development and game-play of the soon-to-be-released rules.

WARGAMING THE ROMAN ARMY - PART 1
Over the next two issues, we will present articles which will cover the development of the Roman army, from the foundation of Rome to the decline of the Empire.

GREAT WARRIORS: BERDAN'S SHARPSHOOTERS
Our occasional series focuses this month on Berdan’s Sharpshooters - those daring fellows of ACW fame.

ON PATROL WITH THE DEVIL'S BRIGADE
Following last month’s Dogs and Devils content - we present a Flames of War scenario and battle report for the Devil’s Brigade in Italy during the WWII Anzio campaign.

WASHING THE SPEARS WITH THE MATABELE
Chris Peers presents a rounded military history of this ferocious warrior nation and offers some suggestions for raising your own tabletop force.

HOW TO BUILD A DUTCH WINDMILL
Every western European tabletop can be enhanced by the inclusion of a windmill, and here’s how you can make your own using bits from around the house.

Osprey's Men-at-Arms
Napoleon's Guard Infantry (1)

WI-272s

Free with every copy of
Wargames Illustrated Issue 272


PLUS we take a look at the Adepticon show in the US, the Tactica show in Germany, and our monthly roundup of News. BONUS free Osprey book with this issue. We packed so much in this issue we had to remove our Reviews. 

What an incredible deal!

Sunday, June 6, 2010

How to Paint 42nd Highlander Kilts - Pt. 1

Finished the basic tartan pattern - this would be the "Government" or "Military" pattern without any of the individual stripes unique to each Highland regiment.

First, the kilts were painted a dark blue for a base:
Second, dark green stripes were added; Three vertical:
And two horizontal:
Light green squares were then added to where the dark green stripes crossed. A lighter blue was also added in the dark blue squares - just to lighten it up a bit:
Next, I'll have to get up the courage to add the pin-stripes between the squares. A minimalist (aka less is more) approach will be taken. That is, for the 79th's Cameron pattern, only one red stripe will be painted instead of the normal two, side-by-side. And instead of a yellow stripe within the two red stripes (since there will only be one) - the yellow stripe will be in the alternating squares. That's the plan anyway. Enough for now - taking a break on this and will rest up before I do the next step.

This is the actual pattern used by the 79th Cameron Highlanders. It incorporates elements of the Macdonald and Cameron Clans.
This is how I hope to simplify it - only one red stripe through the green squares and one yellow through the blue squares. I beg forgiveness for this transgression from the clans, and my intent is not to dishonor them.

Victrix Highlanders - WIP + 3

Finished the dicing pattern on the bonnet band. At first I couldn't get the vertical lines straight, but then I broke down and used a new brush. The brush is among the many bought on the cheap when I was stationed in S. Korea about 5 years ago - there are about 10 or so left.

Here are the vertical stripes:
I used a tip from Peter J. Blum's "The Model Soldier Manual." A small booklet my mom bought me several decades ago when I was starting out painting model figures. I still have it - the publication date is 1971 by Imrie/Risley Miniatures, Inc.
The tip is to hold the figure upside-down when painting the vertical stripes on the bonnet band. This is to ensure the red line doesn't go past the band and onto the face. It probably works better for 54mm and larger figures, but I still used it and it was okay.

The horizontal stripes; I actually didn't run the line through the vertical ones. The area is so small, I just connected the horizontal stripes to where they touched the vertical ones.
Finally, a dab of light green mixed with a little dark green was placed at all of the areas where the red lines crossed.
So far, so good. I haven't spent a lot of brush time on these and the results are pretty satisfactory. I'm thinking that only the front rank guys' kilts will really be seen clearly as they'll be mounted four to a base. The rear guys' kilts probably will be hard to see anyway. I guess I'm saying if I mess the kilts up too bad, it won't be too noticeable - I hope. Next are the dreaded kilts.

Saturday, June 5, 2010

Victrix Highlanders - WIP + 2

I'm taking my time with these; not actual  brush time, but total time to complete them. That is, I'm only working on them when I feel like it. Painting should be fun, right?  The flesh was given a wash of Vallejo reddish brown ink mixed with a little black ink. This time it came out pretty good the first try. I didn't have to highlight the flesh much - only some knee caps and a few noses; and even those really were fine for the gaming table. Also painted the white base for the bonnet band , and dry-brushed the ostrich feathers.
I next have to work up the courage to add the red dicing on the bonnet bands. Hope I don't mess it up too bad. My intent is not to spend too much time and effort on the bonnet, stocking and tartan patterns. It would take forever to get them all exactly right - if it were even possible. I've decided that these will be painted for effect as opposed to accuracy.

Wednesday, June 2, 2010

Meiji Era Imperial Japanese Infantry Cap

A fellow gamer who is an ardent collector of militaria gave me this Meiji Era Imperial Japanese Army cap. It is authentic and dates somewhere between 1886 (when this cap was introduced with the blue uniform) and 1905 (the end of the Russo-Japanese War).  It is in excellent condition, with only a few holes - from insects, I presume. 
The next photo shows the inside of the cap. It looks as if it was hardly worn, if at all - as the sweat band is in great condition. Also, you should be able to make out the stitching of the cloth - it is sewn in a chrysanthemum pattern. It also has a sewn pocket and a brass breather hole. Impressive workmanship - especially if this is a standard issue cap.
Chris B. (who I first gamed with in a Boxer Rebellion playtest - in which I used my Old Glory Japanese) gave me this priceless artifact. He said he only wanted to have it in the possession of someone who valued it. I sure do - my maternal grandfather was born during the Meiji Era (1880's) and moved to Hawaii shortly after the Russo-Japanese War. He was from Kumamoto in the Kyushu Island, and his family was actually samurai. Probably low-ranking, but samurai nonetheless. I remember him telling me a story when he was a kid and was grooming his grandfather's hair; which was a chore he said he hated to do. He said once, when his grandfather fell asleep while he was combing his hair, he cut off the long lock. Of course, when his grandfather awoke his hide was severely tanned. He also used to tell me stories of sword blades that were in  streams or rivers where old battles were fought. He said the blades of those swords were rust-free and still wanted blood. I'm sure he was just telling tall tales, but I sure loved them.

This photo shows General Oyama, the Commander of the Japanese Second Army during the Russo-Japanese War. The cap is very similar to the one above. The general's cap band has black stripes over it indicating his rank. The colored cap bands were yellow for line troops and red for Guard troops.
Below is an interesting period illustration. It shows Japanese infantry during the Battle of the Sha River. The infantrymen are drinking water from the river using their blue caps. They are wearing either summer, or the newly issued khaki, uniforms.
Once my buddy Adrian finishes his Russians, we should have some good RJW skirmish games - either using The Great War rules, or some home brew rules.