Sunday, April 23, 2023

1/48th Bandai Bolshevik Battlewagons - KV-1 and T-34/76

Two more kits that my buddy graciously gifted me. These are old Bandai kits but still look as good as current available kits. If it weren't for my buddy, I likely wouldn't have gotten any Russian armor. Although I did paint up a Tamiya Beutepanzer KV-1 a while ago.

The kits originally came with stickers for markings - very old school, I guess. The decals on these were picked up off of ebay. I tried Googling the Cyrillic slogan on the KV-1 but couldn't find out what it means.
The Bandai kits (including the previous German tanks) come with interiors - engine, gun components, and crew compartments. I skipped using these parts which sped up the building process. However, if one wanted to use them, most of the hatches and lids can be left opened to view the interior. Quite impressive for these older kits.
Wasn't planning on building a Russian force up but may need to get some infantry for support.
As for the green - I experimented with some of the Vallejo Model Air colors. Not having prior experience with Soviet/Russian colors, I'm okay with the results for these. As with most vehicle colors, exposure to the elements would create various shades of the base color.
I dry-brushed Vallejo Yellow Green over both tanks to highlight and lighten up the overall look.
Well, no sooner was I finishing up these two tanks when my buddy dropped off several more Soviet tanks. These are metal models also in 1/48th scale. They size up perfectly with the Bandai kits. My buddy said he knew I liked this scale and he was using 1/56th stuff now. I plan to use the T-34/85's for Korean War Bolt Action to face the Pershing I painted a few years ago.
Thank you for visiting, Comrades!

Monday, April 17, 2023

Bandai 1/48th Hetzer and Panzer II's

Here's the first round of kits donated to me by my buddy last month. I had wanted to start on the Sherman, but discovered it had two hull sprues but missing the turret. Need to ask my buddy if he has it as he said thought he had more kits stashed away somewhere. Anyway, getting a lot more comfortable using the airbrush. I have a process down now - using a jar of water to rinse out the paint cup between colors, and only doing a full cleaning when done.

The crewmen in the dunkelgrau Panzer and the Hetzer are from the Bandai kits; the DAK crewman is from a Perry metal set.
The DAK Panzer will be used in a Bolt Action game I'm hosting next month at Enfilade. I wanted another tank to assist in the assault by the Axis forces. The grey Panzer may be a reason to build an Early-War German force.
As with the previous Tiger kits, used an oil based wash for pin lining and detailing.
The exhausts still need some weathering.
Although old, these kits are still very nice and go together nicely.

On another note, I'm retiring at the end of this month. It'll be my second retirement (retired from the Army in 2008), but won't be able collect from the state until I turn 65 since I only have 15 years. My wife is a great comptroller so we should be good until then. Thanks again for checking out the blog - and I should be doing more gaming once retired, for good.

Saturday, April 1, 2023

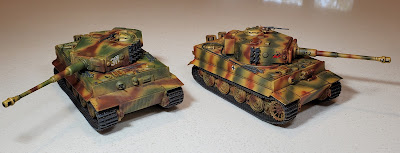
Tiger Hunt - 1/48th Tamiya and AFV Club Tigers Finished

Took a little while to finish these, mainly due to the drying period of the AK Interactive oil washes. The recommended drying time for these are from 12-24 hours. Since this was the first time using them, I went for the full 24-hours as I didn't want it to react badly with the final matte coat of Krylon spray.

The AFV Club kit on the left is supposed to belong to the 102nd Heavy Tank Battalion which served in Normandy. The Tamiya kit on the right is supposed to belong to the 505th Heavy Tank Battalion which served on the Eastern Front. 
Used one of the Bandai figures for the AFV Club tank; the Tamiya kit came with the commander.
The oil wash was used rather sparingly on the zimmerit of the AFV Tiger. When the wash was partially dried, I used a brush with very little thinner on it to wipe away some of the wash to lighten it.
The decals came with the kits and decal setting solution was used. It worked well setting the decals into the zimmerit.
A bit too big for 28mm figures, but they were a nice project to familiarize myself with the airbrush some more.
The picture above shows the two 1/48th Tigers next to a Corgi 1/50th Tiger on the far left. The Corgi looks good with 28mm figures, IMO.

My buddy dropped off a bunch of 1/48th kits he had sitting collecting dust for years - all he wanted was a some beer for them. Here are the kits below - plan to start on the Sherman first.
Thanks for stopping by and checking out the blog and current projects. Until next time, wishing you all the best in your endeavors!