Sunday, March 26, 2023

Tigers Striped - 1/48th Tamiya and AFV Club Models

Pulled out the airbrush again today. Initially only planned to prime them, but ended up adding the camo. The one without tracks is the AFV kit that has zimmerit molded on; the other one is the Tamiya.

This time I used the Vallejo set that has Dunkelgelb RAL 7028 and other colors. I painted the Tamiya first using the Olivgrun RAL 6003, but it looked too dark. For the AFV Tiger I added a some brighter green from the other Vallejo set I had. The Rotbraun RAL 8017 was also a bit too dark for my tastes so I added some reddish Rotbraun RAL 8012 (primer) to it.
The pattern on the Tamiya reminds me a bit of Charlie Brown's t-shirt design.
For detailing I plan to use oil washes - it'll be another first for me. Supposedly this is a better way to do pin-lining as the oil based wash can be cleaned up using mineral spirits/thinner which should leave the acrylic painted camo unaffected.
Pretty satisfied with the results of the airbrush. One thing that was a little troublesome was having to stop a few times to clean and unclog the airbrush.  Also, as this airbrush doesn't have a detachable paint cup, I had to clean it out between colors.
I also painted up and stained some tank commanders. The one on the far left is from the Tamiya kit and the rest from an old box of Bandai figures.

Well it was nice to get more familiar with the airbrush. Thanks again for dropping by and wishing you all the best.

Friday, March 24, 2023

Perry DAK - Based And Ready For Bolt Action

Finished up the 12-man sprue of Perry plastic DAK figures. Nothing special here - just blocked painted, followed by Minwax Tudor Satin stain and sprayed with matte. Used Warlord Games 25mm rounds to match the rest of the figures for Western Desert Campaign.

Nice figures, as expected from Perry. As I didn't have the entire set, not sure how many more arm/weapon options may be included but the single sprue I had seemed to have only a few spares. That is, I would've liked to have more firing poses - particularly with rifles.
I do like the simplicity of these figures - all of the equipment worn on the rear are molded in one-piece, making it easy to attach to the figure.
Picture above shows a Perry figure with a Wargames Atlantic figure to the left and a Warlord Games (metal) to the right. The Perry figures is slightly smaller than the other two, but looks okay on the gaming table with them.

Thanks for stopping by and checking out this small project. Best wishes to you all.

Thursday, March 23, 2023

Perry DAK - WIP

Perry DAK WIP. Just a 12-man plastic sprue picked up from ebay. Figured the Axis needed a few more troops since they'll be the attackers in a Bolt Action scenario. Haven't picked up the full box yet, but this sprue only had a few arm/weapon options. Specifically, there are two prone figures - one of which has a rifle already molded onto the main torso. The other prone only allows either an anti-tank rifle or MG 34. There is another arm/weapon option for the MG 34, but it is a shoulder carry pose. I chose to use the anti-tank rifle for the prone and use the shoulder carry for the MG 34. In Bolt Action, infantry attacking armored vehicle can only cause minor damage if the unit doesn't have anti-tank weapons. Figured this will give the unit a fighting chance. Although in the last game at Fix Bayonet, the Italian unit without anti-tank weapons caused the Crusader to be destroyed even with minor damage rolls.

With the usual Minwax Tudor Satin stain treatment.
Block painted with various khaki and OD colors from the Vallejo DAK paint set.

After these are done I have two 1/48th scale Tiger I plastic kits - one an AFV Club and the other Tamiya. Plan to get some more airbrushing done on them.

Saturday, March 18, 2023

Fort Steilacoom Fix Bayonet Game Day

I was able to host a Bolt Action Western Desert game in the morning period. The brown felt represent dug in positions for infantry. The players were allowed to choose to use them or not. They chose to use them.

The Axis failed their preparatory bombardment with a die roll of 1. The Axis players chose to leave three units in reserve and made the initial attack with the rest.

The very cool historical building we get to play in. 
An ACW game with great looking figures. 
Another Bolt Action game. 
The Allies stayed in their dug outs for most of the game - making the Axis advance cautiously. Here a Panzer IV tries to fire HE into a mortar position.
The sole tank casualty, a Crusader - caused by Italian Bersaglieri infantry assaulting it, of all things!
Montgomery was the overall commander for the Allies - and Rommel the Axis. Both had level 3 bonuses.
A Rebels and Patriots game. 

This was the other Bolt Action game in the first period. ETO looks like - maybe a Band of Brothers scenario.
Altar of Freedom ACW game in 6mm (scale correction thanks to Matt!). This is the game in the library.
Dragon Rampant game.
Wings of Glory game.
A few pictures of the Chain of Command Stalingrad game being set up. All the terrain was handbuilt by the host - he even made the train tracks by hand. He said he didn't want to use ready made train tracks because they didn't have correct amount (for him) of ties per track length; or something OCD like that.
I had to leave before the second period gaming started.
The small venue can host 4 tables per period. Although the second period used the library for an ACW game - the gamer who is part of the Fort Steilacoom Historical Society used it. Rank has its privileges.
A great day to game and spend time with old (and new) buddies. 

Saturday, March 11, 2023

1/48th Tamiya Jagtiger and 1/50th Corgi Panther - Slightly Weathered

Dry brushed both tanks to soften the greens as I thought they were a bit too dark. This gave the tanks a slightly weathered look too.

Plan to use a lighter/softer green for future projects.
The Tamiya 1/48th Jagdtiger with Victory Force minis for scale comparison.
The 1/50th Corgi Panther, again with Victory Force figures for comparison. I think they look both look like good matches for 28mm figures - especially the ones on the larger side like these.
Head on scale/size comparisons.
Although they are slightly different scales, they seem to work well enough together.
It was a decent experience using an actual airbrush for the first time. It's a nice addition to the hobby toolbox, particularly for projects like this.

Well, so much for now. Thanks again for stopping by and checking out the blog. Best wishes to you all!

Friday, March 10, 2023

First Attempt At Airbrushing - 1/48th Tamiya Jagtiger and 1/50th Corgi Panther.

I just tried out a newly acquired airbrush set and paint booth with fan and air filter - both were on sale from Amazon. The airbrush with compressor was $59 USD - so couldn't pass it up. I also ordered a set of Vallejo airbrush acrylics - also on sale - about $30 for 16 bottles. The primary use for the airbrush was to apply camo to German armor. So - my first attempt was a repaint of an old Tamiya Jagdtiger I had painted green camo stripes on by hand. Never was really satisfied with the results. Immediately after the Jagdtiger, I added camo the Corgi Panther that had been given a coat of dunklegelb. The results for both weren't total disasters, and learned a lot of how to apply the spray. Namely, hold the airbrush close to the model to reduce unwanted overspray. And also to apply successive light coats rather than single heavy ones. I did the latter a few times as I tend to be impatient.

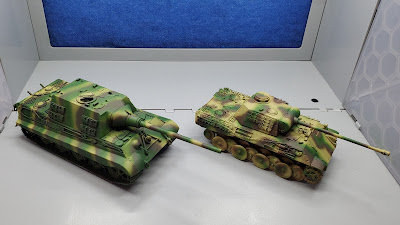
The lines on the Jagtiger are a little closer than I had wanted - wanted to leave more of the dunklegelb basecoat showing. Also, the green for both tanks is a bit darker than I wanted. I mixed the colors by eye, and rather haphazardly and quickly. The colors looked okay on test paper, but spraying too thickly on the models made the colors darker. I may drybrush dunklegelb over the finishes to lighten it up a little. Otherwise, I'm very happy with the airbrush and paint booth. Again, this was my first time using an actual airbrush - the only previous experience was a time or two with those old Testors airbrushes needing a can of compressed air. The few times I used it the airbrush would clog up after a minute or two - leaving me with a barely used can of compressed air.
Here's what the Tamiya Jagdtiger looked like with hand-painted green stripes. I was able to remove the decals that were on using decal softener - a tip I found on YouTube. The decals were on for several years and came off with little effort.
Here's the paint booth and airbrush with compressor. The paint booth has nice LED lights and a small removable turntable. It has a decent fan to suck out overspray and fumes, which aren't much as I plan to use acrylic water-based paints. The airbrush compressor isn't much louder (or more powerful) than a good aquarium pump. You can't hear it over the paint station's fan anyway. Cleaning up the airbrush between colors and afterwards wasn't as bad as expected. Just had a dropper and cleaning solution onhand the whole time.
The paint booth fan comes with an expandable hose for the exhaust. Since I painted it indoors without venting outside, I placed the end inside of a flower pot. I didn't notice any residue inside the pot afterwards.

Well, I'm in the big leagues now that I finally have an airbrush. We'll see if I'll have other uses for it. I've seen YouTube videos with folks using it to prime figures and also for larger areas as a basecoat. Until next time, thanks for your visits and hope you find it interesting. Best wishes to all.

Thursday, March 9, 2023

1/48th Scale Shermans - Tamiya and Hobby Boss Kits

Wanted a couple of Shermans with cast hulls. The other Shermans I already have are 1/50th Corgis - and they don't make them with cast hulls, so ended up trying out these two 1/48th scale kits. They're slightly bigger overall than the Corgis as expected being a larger scale, but close enough. The picture below has the Tamiya on the left with a 75mm gun and the Hobby Boss on the right with a 76mm gun.


I used a can of Krylon OD green which looks pretty good - especially after a wash of Vallejo Skin Wash. A light dry brush of muddy brown was also applied. The figures are old Easy Eight dismounted tankers that were modified to go in the hatch. Basically cut off the lower half and clipped off the grease guns they were holding.

The Tamiya Sherman.
The Hobby Boss Sherman.
I'm probably in the minority with my preference for 1/50th-1/48th scale, with most favoring 1/56th scale, but I started out with 1/50th Corgi tanks and the figures I use are mostly on the larger side of 28mm. These two figures are Victory Force Miniatures and look okay with vehicles in this scale - at least to me.
Size/scale comparison with a Corgi, Tamiya, Hobby Boss, and another Corgi.
Top view comparison - Corgi, Hobby Boss, Tamiya, and Corgi.

My next project is attempting camouflage onto a Corgi Panther using a newly acquired airbrush. On the gaming front I'm hosting a Bolt Action Western Desert Campaign game next Saturday at our long-awaited Fort Steilacoom game day. We hadn't had a game day there since 2019 - right before the pandemic (remember that thing?). :) Anyway, just dropping a post to the blog to show that I'm still with it. Best wishes to you all!