I just tried out a newly acquired airbrush set and paint booth with fan and air filter - both were on sale from Amazon. The airbrush with compressor was $59 USD - so couldn't pass it up. I also ordered a set of Vallejo airbrush acrylics - also on sale - about $30 for 16 bottles. The primary use for the airbrush was to apply camo to German armor. So - my first attempt was a repaint of an old Tamiya Jagdtiger I had painted green camo stripes on by hand. Never was really satisfied with the results. Immediately after the Jagdtiger, I added camo the Corgi Panther that had been given a coat of dunklegelb. The results for both weren't total disasters, and learned a lot of how to apply the spray. Namely, hold the airbrush close to the model to reduce unwanted overspray. And also to apply successive light coats rather than single heavy ones. I did the latter a few times as I tend to be impatient.
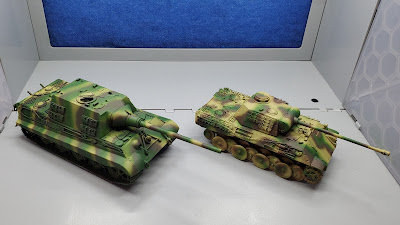
The lines on the Jagtiger are a little closer than I had wanted - wanted to leave more of the dunklegelb basecoat showing. Also, the green for both tanks is a bit darker than I wanted. I mixed the colors by eye, and rather haphazardly and quickly. The colors looked okay on test paper, but spraying too thickly on the models made the colors darker. I may drybrush dunklegelb over the finishes to lighten it up a little. Otherwise, I'm very happy with the airbrush and paint booth. Again, this was my first time using an actual airbrush - the only previous experience was a time or two with those old Testors airbrushes needing a can of compressed air. The few times I used it the airbrush would clog up after a minute or two - leaving me with a barely used can of compressed air.

Here's what the Tamiya Jagdtiger looked like with hand-painted green stripes. I was able to remove the decals that were on using decal softener - a tip I found on YouTube. The decals were on for several years and came off with little effort.
Here's the paint booth and airbrush with compressor. The paint booth has nice LED lights and a small removable turntable. It has a decent fan to suck out overspray and fumes, which aren't much as I plan to use acrylic water-based paints. The airbrush compressor isn't much louder (or more powerful) than a good aquarium pump. You can't hear it over the paint station's fan anyway. Cleaning up the airbrush between colors and afterwards wasn't as bad as expected. Just had a dropper and cleaning solution onhand the whole time.
The paint booth fan comes with an expandable hose for the exhaust. Since I painted it indoors without venting outside, I placed the end inside of a flower pot. I didn't notice any residue inside the pot afterwards.
Well, I'm in the big leagues now that I finally have an airbrush. We'll see if I'll have other uses for it. I've seen YouTube videos with folks using it to prime figures and also for larger areas as a basecoat. Until next time, thanks for your visits and hope you find it interesting. Best wishes to all.


Very nice work for a first attempt Dean...I think the Panther is the nicer of the two but the Jagd tiger is also better than the earlier version. I have not ever really used an airbrush...my patents bought me a Humbrol one for a birthday or Christmas present around the age of twelve nut I was too young to spend time working out how to operate it....I had a couple of attempts then gave up and I expect it as chucked out in my late teens when I took a bit of a break from hobbies.
ReplyDeleteThanks, Keith. I figured with Amazon, if I couldn't get it to work I could return it. But it seems to work alright. Also, it was a fairly inexpensive one so not a big investment. Warmest regards, Dean
DeleteWell, there will be no stopping you now with the airbrush! I will try mine as soon as we start getting over 50 degrees outside, as my garage is unheated.
ReplyDeleteThanks a lot, Joe. The paint booth with air filter seems to work fine indoors. It's still cold here too. Best regards,Dean
DeleteGood job, eventually I will pick up one of those sprayers. Oh, and cute dog.
ReplyDeleteThanks again, Christopher. Yes, Joy is good little buddy. Warmest regards, Dean
DeleteA really nice job on both vehicles. I bought a couple of military modelling magazines as they had good pictures for camo and it is surprising how many different styles / shades etc there were, so most attempts at doing this sort of thing will be right and certainly fine for us wargamer types.
ReplyDeleteI think your green is fine and could go even darker without undue concern.
I bought a pre-paint die-cast Elephant Vehicle and thought the camo really weird and unlikely ….. then I saw a photo of that same scheme in the flesh! Probably the same photo was the inspiration of the painter.
I use the Vallejo air brush paints, but even wit these, I add a drop of thinner into the mixing bowl - thin is good.
For practice, take a sheet of card or paper and do several passes over it, changing the distance of the air brush tip from the paper and altering the amount of pressure you put on the trigger, it is just a faster way to get to appreciate the characteristics of the airbrush Vs needle size.
Sound like I know what I am talking about, but I don’t really, I’m still at beginner grade and use mine mainly for base coating vehicle and buildings and in the summer, I will varnish up figures, even returning to some old bases, just to boost their protective coat.
Thanks for your encouraging words and advice, Norm. Much appreciated. For the record, I did at a few drops of flow improver. Although, I'm not exactly sure how much for the best results. Warmest regards, Dean
DeleteThe general advice seems to be that the paint should be thin like milk ….. not the most helpful guide! But I suppose it is meant to mean runny rather than viscose.
DeleteThanks again, Norm. I plan to practice more in the future. Best regards, Dean
DeleteImpressive results, tech has moved on as last time I tried a spray it just blocked up. Not sure I would get my moneys worth though ?
ReplyDeleteThanks for the kind words, Matt. I think this entry level airbrush kit will serve me well. Don't intend to do anything intricate with it. Kindest regards, Dean
DeleteVery good job Dean! It's not as easy as it looks.
ReplyDeleteChristopher
Thanks, Christopher. Yes, I was constantly on the go during the painting. That is, I wasn't sure how long it took to have the airbrush clog. It didn't, so in the future I may relax the pace while spraying. Kindest regards, Dean
DeleteAnother great work Dean!
ReplyDeleteThank you so, Michal! Warmest regards, Dean
Delete