Friday, February 26, 2016

15th C. Italian Style Armor - WIP

Not a painting or gaming post, but just an update on what I've been up to. Here's the start of a 15th Century Italian/Milanese style armor kit. A newly arrived breastplate next to the Sallet and bevor.
The 15th C. Italian style breastplate arrived yesterday. It's made by a company called Lord of Battles - an Indian maker carried by Kult of Athena. It's under $100 - less shipping. The placart (belly plate) is attached by sliding rivets to the breastplate. There is a single fauld at the bottom of the placart.
The sliding rivets allow for the length of the breastplate to adjust to the wearer. They come in Medium - which is what this one is; Large and Extra Large. The sizing is more for the width. This one fits very well with the arming jacket and mail haubergeon under it.
After cutting off the ends of the sliding rivets (yellow arrows), I peened them tighter to the highest position. The overall length is about 17 inches - to the bottom of the fauld.
It has a very nice rounded shape which is historically correct. Many reproduction breastplates are too flat. A pair of Milanese mitten gauntlets and spaulders are next - once those arrive and fitted, I'll have some photos of the whole kit. Apologies, for the lack of the brushwork and gaming and thanks for visiting.

Sunday, February 14, 2016

Nordland Captain of the Guard

So here's the second Empire character figure which was picked up at a sale a few years ago. The body is from the plastic Master Engineer kit. Pistolier and Reiksguard Knight arms are used, as well as a Huntsmen's head. Although the Master Engineer head and Hochland Long Rifle are cool, I already had a couple of Master Engineers already, so opted for a more close-combat looking figure.
I have no clue as to the Nordland fluff, but chose the blue and yellow colors as they look pretty nice.
With the red cloak and hat, he could also pass for a Marienburger, I suppose.
Since I haven't taken pictures of 28mm figures for sometime, I'm still struggling to get the lighting right. These are a bit washed out from the flash.
The shield is from one of the earlier Swordsmen kits.
To be honest, I only got into Warhammer Fantasy a few years ago, and then only played a handful of games. The release of Dragon Rampant has provided a new lease on life for these troops.

Prepping for a Convention - 3 Months in Advance?!

This may sound a bit early for a convention in May, but I just finished marking positions of major terrain pieces using masking tape placed on the terrain cloth to be used. This way I don't have to worry about trying to remember how to set stuff up during the convention, particularly with sectional terrain like the roads and river. This is for a Lion Rampant game based upon First St Albans - a game played about a year ago. What set me in motion was being reminded by the event coordinator last night via email that I had committed to running a couple of games.
My wife's puppy wanted to know what was going on above her, so I hoisted her up for a looksee.
Once everything is put away, I will start on another Empire figure which has been sitting in a box for a few years.

Friday, February 12, 2016

Empire Greatswords Captain

Finally got around to picking up a brush today. This is the first 28mm figure I've painted in about six months. It's a GW Empire Greatswords Captain with a head swap from an Empire Knights kit. He's been sitting in a box for several years - picked up when a store was having a sale.
Painted him in the colors of Talabheim - the red and white is both simple and striking, IMO.
The cool wavy-bladed two-handed sword is known as a flameberge; or in German, flammenschwert - flame sword.
Coupled with the Landsknechts' characteristic puffy slashed sleeves, what's not to like?
Anyway, a slow start to painting again, but something I found not unpleasant. Warmest regards to you all.

Saturday, February 6, 2016

Late 14th/Early 15th C. Transitional Armor in the Italian Style

Pardon my indulgence, but it's Armor Up! Saturday again. Here is an interpretation of so-called Transitional Armor of the Late-14th to Early-15th C. The pieces are based upon armor displayed in Churburg Castle. The segmented breastplate is commonly known by modern historians as Churburg #13 - the cataloged number of the suit in the castle.
Along with the breastplate, plate limb armor is worn with a mail haubergeon. A mail aventail also protects the neck and shoulders under a hounskull bascinet. The Mid to Late-14th C. was period where plate was taking over mail, but not completely, hence the Transitional moniker.
Note the half sleeves of the haubergeon being worn over the shoulder and upper arms. My long-suffering wife tied on the arm harness to the mail - as well as took the photos. I vacuumed the house and washed the dishes in return.
The hand and a half sword was popular during this period. I may someday get mail or plate sabatons, but my zip up ankle boots are stand-ins once again.
Out mushroom hunting in the backwoods of Puyallup.
Reflecting with the trusty falchion.
On campaign with the boys.
Remember to take your vitamins and say your prayers.
Thanks for bearing with me. The only painting I've been doing lately is with Microsoft Paint.net.

Thursday, February 4, 2016

15th C. Sallet

Got another armor delivery today - a sallet based on the one found in the church at Witton-le-Wear in Durham, England. The helmet and bevor are 14 Gauge steel, and weigh around 10 pounds together. It's well balanced, and once strapped on doesn't feel heavy at all. Putting on and wearing armor is how I get my cardiovascular work out and weight training.
Without the bevor.
Although it was found in England, it is believed to have been made in the Northern European style for export. The original is dated to the Mid to Late-15th Century.
With the bevor worn.
The thickness and weight of this reproduction is a bit more than the original, but not by too much. With proper padding this would hold up pretty well in full contact reenactments. The eye slits a little bit wider than the original, but thrusting and stabbing aren't allowed in full contact reenactments - go figure.

The helmet was listed as new, and the liner looks clean and never worn, but I think it laid around somewhere for a while as it had tiny spots that look like rust and the finish is a bit tarnished. Nothing a little bit of scouring with fine steel wool won't take care of. I think the woman who sold this on ebay didn't really know much about it - her ebay store had no other armor listings or anything remotely military. Everything else in her store was either ceramics or quilts and such. I can't say it was 50% cheaper than from a retailer, but it was close.
The over-sized brass rivets are actually authentically reproduced. When I first saw it I thought it looked odd, but here they are on the original sallet in the image below.
The visor stays up by friction if pushed up all the way. Saves me the trouble of trying to peen the rivets tighter, or replace them with lock nuts like I did with the bascinet.
The leather liner that is glued to the inside is not historically correct, but I don't plan on replacing it with a more correct padded fabric liner. I would just wear a padded coif in addition to the liner if I thought someone was going to clobber me on the head. I plan on dyeing the helmet straps a darker brown to match the one on the bevor.

Wednesday, February 3, 2016

Talhoffer Buckler

Came home from work early today to try out a "Talhoffer" buckler. It's 16 gauge steel and very nicely shaped - not bad at all for $35USD, free shipping. Note the faux "acorn hat" with Seahawks logo.
Anyway, this is one of the types of bucklers seen in the 15th Century illustrated manuscript authored by the fencing master Hans Talhoffer. The one on the right in the picture below has knobs or spikes around the edges.
Talhoffer was quite a man of his times with interests in several fields besides the martial arts - a few I had to look up as I'd never heard of them before, like onomastics and auctoritas. Spell check doesn't even know what they are. He also trained opponents for Trial by Combat.
As a buckler is mainly for parrying, it doesn't protect like a shield proper - as reflected by most rules. No missile saves!
The flanged shape and upturned ends were designed to deflect blows and thrusts.
The center hand-held grip also denotes its primary function.
Anyway, it's a nice mid-week diversion that is otherwise filled with work and fighting traffic. En Garde!

Saturday, January 30, 2016

It's Armor Up Saturday!

Well, I just had to get into the harness again, this time as a Late-14th/Early-15th C. French Man at Arms. The breastplate is worn under the padded jupon as was the fashion at the time.
I'm not wearing the arm harness or the arming jacket. Taking the suggestion from an armor site post, I used my old Army LBE - basically a pistol belt and Y harness to point (tie off) the leg harness. It actually works really nicely. I still need to get period foot wear; until then my zip up ankle boots are stand ins.
From what I've seen, the majority of folks doing reenactment chose English personalities to base their kit on. Personally, I like the French images of the time - as below:
They better not be talking about me.
Until I live next to a castle, Microsoft Paint.net will have to do.
On the painting desk there is another (and final) 120mm resin mounted knight. This one also has full cloth barding, but the fairly static walking pose, should make the painting a lot simpler.
Au revoir!

Wednesday, January 27, 2016

Ich Dien - 120mm Imperial Gallery 14th C. Knight - Finished

Just finished up the figure - the Super Glue is still wet holding the shield to the arm precariously. Ended up painting him as the Prince of Wales with his so-called Shield of Peace. I managed to write "Ich Dien" on the scrolls on the shield with a Micron Pen. This time I first sprayed the painted shield with clear acrylic. This made writing with the pen much easier as the brushed on acrylic tends to clog up the tip of the pen. This is something I couldn't have painted when I bought it about 10 years ago. Painting heraldry in 28mm gave me the courage to attempt it here and glad I did. Guess I can call him alternatively, "Ten Years After."
I added some "shrubbery" around the dowel holding up the horse. Not perfect, but better than the plain dowel.
Purist will note that I did not add the Prince's label over the Arms of England to denote his status as the heir to the throne. As in the previous post I didn't want to obscure the lions where the label would be placed over.
The shield that came with the kit was poorly molded and so thin it cracked apart when I tried to cut it from the excess resin. Heated plasticard worked fine for a replacement. Although as you can see in the photos above and below, I neglected to fabricate the padding and straps in the back of the shield. Chock it up to laziness. Life is too short for these things!
The sword, scabbard, tail of the chapeau, horse stirrups and bits are metal parts. The reins and stirrup straps are cut from left over paper from the Bengal Lancer project.
I kept the surcoat plain without displaying arms, but added an ermine pattern to the lining.
The pose reminds me of the knight crashing through the little boy's bedroom in "Time Bandits" - love the war cry - "Eeeeyaaaah!" Anyway, this is the third large figure I managed to paint this month which otherwise would still be sitting in boxes going on a decade or so. Cheers to all of you!

ADDENDUM:  I should've included an image of him next to 28mm figs for scale - so here he is ready to slay a myriad of them.

Saturday, January 23, 2016

120mm Imperial Gallery 14th C. Knight - WIP +2

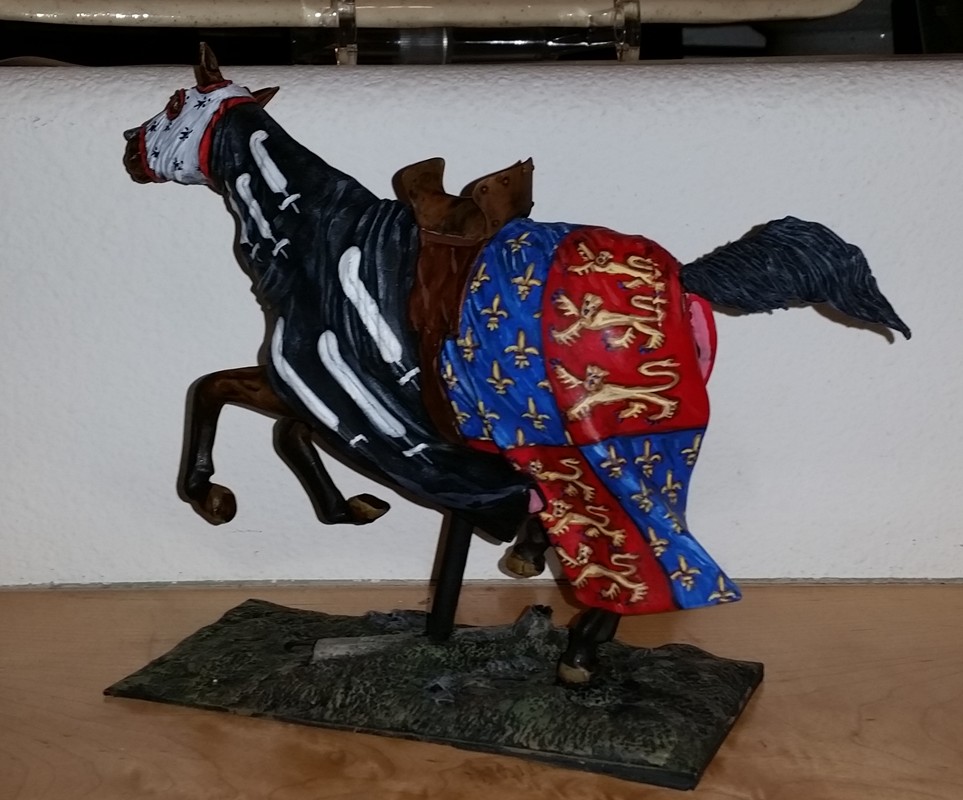
Horsey is done. I had to use a wooden dowel to hold up the horse due to its spirited pose. The way it is intended to be attached to the base is with the two hind legs pegged into it. However, as one of the legs - the rear right raised one - is supposed to go in the broken limb of the dead tree was way too flimsy. Hopefully adding some tall grass around the dowel will hide it a bit.
Anyway, it's secured to the  base and won't topple over or worse break a leg...or two.
The ermine markings on the face covering were painted with a fine tipped brush. I tried using a Micron Pen, but it kept drying out. Maybe it's too old, but ended up using the brush which was faster anyway.
Under the head covering there is a plate chamfron. Never growing up around horses, I always presumed the open part of their ears face forward, but I now know they can twist their ears.
Well, now that the mount is done, I can start on the rider. I like to tackle the hardest parts of projects first.